
Behind the scene: pink roses
Yesterday I did a photoshoot with pink roses. In this blog I try to explain which items I have used, how I did my setup and what I did in the post processing. The last part is a short explanation about the blurry background also known as bokeh.

Introduction
In this blog I will explain which items I have used for this setup, how I set it up and the post processing proces. At the end of this blog I will explain something about how to get 'bokeh', the blurry background.
How I made the setup:
The set up cost me about one hour to complete. The hardest part was to get the roses in a nice bow around Mieps and Archie. At first I took some shots of Mieps with the roses around
her.
My mum came up with the great idea to use an old wooden house as a base to attach the roses to. We used tape to make them stick to the house.
I used my regular setup with the clothing rack, the roll curtain and my reflective screen to light up shadows.


I have used:
- Old music books (1) from my dad
- Pink roses from the supermarket (1)
- Glass table top from IKEA (2)
- Black roll curtain from IKEA
(3)
- Glittery decorative fabric (3) bought at a budget store
- Fairy lights on battery (3) bought at Action and HEMA
- Round wooden house (4) bought at a petstore

Post processing
I used the program Photoshop to edit the photos from this photoshoot.
I started with selecting the images I liked the best, I prefer doing this with Adobe Bridge. You can easily give stars to photos you like, so you can find them back later.
When I start editing I begin with adjusting the RAW file in the RAW converter. With the photos from this photoshoot I adjusted brightness, white balance, shadows and I added some brightness to
Mieps and Archie's eyes.
When I finish with the RAW converter I open the photos in Photoshop to start editing.
Step 1: At first I adjusted the colours with Nik Color Efex pro to make the image more moody. You can download this plugin for Photoshop for free.
Step 2: After I was satisfied with the colour corrections with the Nik collection I cloned away the spot where Mieps her abscess used to be.
Step 3: To complete the image I adjusted the brightness and contrast, I applied colour correction to make the roses more pinkish. At the end I made Mieps her eye a bit
brighter by placing a white dot on it with the layer blend mode 'overlay'.
Step 4: The final step is adding my watermark and save it to a jpeg file so I can share it on Instagram.

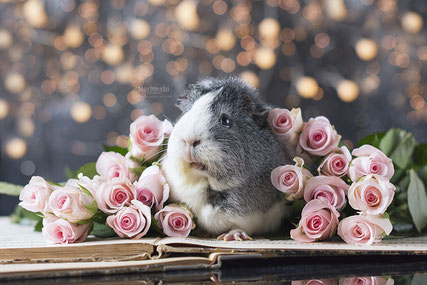
The original photo
After cloning the lights and adding the Color Efex Pro adjustments
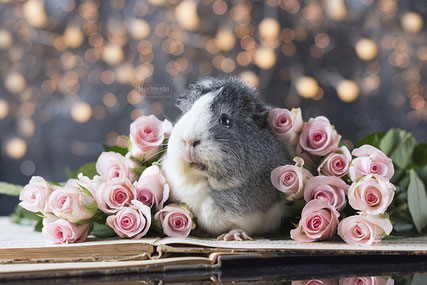
I cloned the spot away where her abscess was

Settings: ISO 400 - F2,5 - 1/320 sec. Camera: Nikon D7200 Lens: Nikkor 50mm f1.4
Editing software: Photoshop and the NIK collection
How To Get Bokeh
I often get the question how I get the ''blurry background''. The blurry background is called 'bokeh'. I try to explain how you can get bokeh in your photos in the video below.
A few tips to get pretty bokeh:
- Make sure there is enough distance between the subject and the background
- Use a low aperture (like f2,0)
- Bright light helps to get nice bokeh. Wait for the sun to shine on your background or through your background if you work with a natural one like trees or use fairy lights in a indoor
setup.

Enough distance between the subject and the background helps


Settings: ISO 400 - F2,5 - 1/250 sec. Camera: Nikon D7200 Lens: Nikkor 50mm f1.4
Editing software: Photoshop and the NIK collection
Write a comment
Agathe (Thursday, 16 February 2017 19:35)
Hello Marloes, thank you for your great article. The explications are very fine ;) I will try to use Photoshop well ! Bye �
Corneliet (Friday, 17 February 2017 12:36)
Dank voor de heldere uitleg en leuke "behind the scene" foto's. Ik heb weer ideetjes opgedaan ��! Gr. Corneliet/Lilly
Pam M. (Friday, 17 February 2017 17:23)
Always such beautiful photos, but when you explain your process, it makes us realize how incredible your artistic process really is!!
Saskia Chiesa (Wednesday, 17 February 2021 08:17)
Lovely photo shoot!!!!